 |
| acrylic on 18 X 24 in. canvas |
Wednesday, July 30, 2014
Wave Without Seagulls
Monday, July 28, 2014
Fall Reflections
 |
| acrylic on 18 in by 24 in canvas |
Saturday, July 26, 2014
More Fall Colors
 |
| acrylic on 12 in by 16 in canvas |
Friday, July 25, 2014
And Now for Something Completely Different
 |
| acrylic on 12 in by 16 in canvas |
I did the painting over a couple days. The first day was spent working on the clouds/sky. Here is what it looked like after day 1:

I thought the skies needed a little more punch so I decided to try a glaze with alizarin crimson. Since I have never done a glaze before I searched online for instructions. I got a little too heavy handed in spots, but I think the glaze helped convey the stormy atmosphere.
Wednesday, July 23, 2014
Acrylics Lesson 3, Finished Painting
I just finished the third painting from the Varvara Harmon book. The take-aways:
- I am more comfortable using the liner brush, but still need lots more practice
- I need a lot more practice painting trees.
- I need to learn when to stop. For example, I got carried away with the tree leaves, and I made some changes to the distant grassy area that messed up the painting and I had to scramble to tone down the changes.
Here is the final result:
 |
| acrylic on 12 in. by 16 in. canvas |
As chance would have it, I heard Elizabeth Gilbert (author of Eat, Pray, Love and The Signature of All Things) on NPR this morning. Among other things, she and the host talked about her belief that women are more prone to perfectionism than men, whereas men in general are more willing to accept "good enough" (I'm paraphrasing). When I was young my perfectionist self knew I did not have the talent to be a great artist, so I let my interest in drawing and painting slip way down in my list of priorities. I am now giving myself permission to do "good enough" and even fail. What is most important is to try. And I am having loads of fun doing it!
Tuesday, July 22, 2014
Acrylics Lesson 3, Phase 1
I've started on lesson 3 in the Varvara Harmon book. This is an autumn scene. Who doesn't love paintings of autumn scenes!? The example in the book looks great. We'll see how mine turns out.
I have completed what I call phase 1: the sky, background and the grass. This is supposed to look like fog in the background. I may have put in a little too much detail, but I am pretty happy with the results. I decided to photograph this before tackling the foreground tree. I'm a little scared about the foreground tree since it is the focal point of the painting and I will either make it or break it with that single element. Such pressure!
I have completed what I call phase 1: the sky, background and the grass. This is supposed to look like fog in the background. I may have put in a little too much detail, but I am pretty happy with the results. I decided to photograph this before tackling the foreground tree. I'm a little scared about the foreground tree since it is the focal point of the painting and I will either make it or break it with that single element. Such pressure!
 |
| acrylic on canvas, unfinished |
Sunday, July 20, 2014
Palettes
I wish I could have all the money back that I have spent on art supplies of one type or another that just haven't worked out. Case in point: palettes. When I started using watercolors for pastel underpaintings, I bought the Richeson Lock Box, which seemed like a good idea at the time. I bought it with the slant insert. Then I bought the paper inserts, which I planned to use for acrylics. The problem is so much of the palette space is taken up by the locking mechanism in the center, which leaves a lot less space for actually mixing paint. I probably will continue to use the Lock Box for watercolors, but not for acrylic paintings. Mostly, thought, I mix my Senellier watercolors in the built-in palette of the metal case the paints came in.

After trying the Lock Box, I started reading good things about the Masterson Sta-Wet palette, so I decided to give it a try. I ended up buying the Super Pro Sta-Wet palette. The palette surface is 12 x 16 inches. For acrylic paints you use the supplied sponge covered by a disposable palette sheet. The wet sponge keeps the surface moist, to help keep the paints moist while painting. As a bonus, the lid of the Super Pro palette has indentations around the perimeter for watercolors, with a large surface for mixing.
Here is what my palette looked like today after cleaning off unused acrylic paint, rinsing and scrubbing:
I have used that particular palette sheet for three or four paintings. The pigments of the paints end up staining the sheet, but it still can be re-used. Or you can replace it with a new sheet.
If I frame the palette sheet and put it on eBay as an abstract work of art, how much do you think I could get for it?
Acrylics, Lesson 2
Today I finished the second painting from Varvara Harmon's 'Painting in Acrylic' published by Walter Foster.
I did better on the trees but I'm still having trouble controlling the liner brush. I am not getting a smooth, crisp line.
I also don't like how the canvas ripples. Next time I might try stapling the sheet to the board rather than taping it. I am using a Grafix Incredible Art Board, which is advertised as a great surface to use for stretching watercolor paper. You are supposed to be able to staple stretched paper to the surface over and over without the board buckling.
I also spent some money today on an "economy" pack of 12 by 16 stretched canvases. From the price I paid, I'm sure they aren't "artist" quality, but I am hoping they will be good enough for practice while I am learning about acrylics.
 |
| Acrylic on Blick canvas sheet, 12 in. by 16 in. |
I also don't like how the canvas ripples. Next time I might try stapling the sheet to the board rather than taping it. I am using a Grafix Incredible Art Board, which is advertised as a great surface to use for stretching watercolor paper. You are supposed to be able to staple stretched paper to the surface over and over without the board buckling.
I also spent some money today on an "economy" pack of 12 by 16 stretched canvases. From the price I paid, I'm sure they aren't "artist" quality, but I am hoping they will be good enough for practice while I am learning about acrylics.
Thursday, July 17, 2014
First Attempts with Acrylics
I am taking a break from pastels to try acrylic painting. I have been following exercises in Lee Hammond's book on painting landscapes. I have been practicing brushstrokes and have painted a few of the simple examples. Today I decided to try the first painting from Varvara Harmon's 'Painting in Acrylic' published by Walter Foster. Here is the finished painting:

This is painted on a Blick canvas sheet. The canvas has rippled a bit, which you might be able to see in the sky. I think next time I will probably try Fredrix canvas sheets, which are sturdier. In any case, I am encouraged by the results and can't wait to try the next lesson.
Wednesday, July 16, 2014
Underpainting
After I finished the community ed pastel painting class I realized that I needed a lot more than just a few night classes. So I looked for books and online sources of instruction. Just about every resource I found put an emphasis on doing underpaintings. I watched some previews of Artists Network presentations by Liz Haywood Sullivan on You Tube and was fascinated by how she made underpaintings with pastel and alcohol. Later I found some great You Tube videos of Leesa Padget painting, set to great background music (highly recommended!). I thought "I need to try this!" So I did, and I have been hooked ever since.
Pastel and Alcohol Underpainting on Pastelbord
This is one of the first paintings I did with a pastel and alcohol underpainting. This is also the first painting I did on Ampersand Pastelbord, and I must say I love this surface. It is great for any wet media underpaintings, plus I love how it grabs the pastels.
Watercolor Underpainting on Pastelbord
Pastel and alcohol underpaintings are great, but I really wanted to try watercolor. I found a photo taken at Monet's Giverney in the Wet Canvas reference image library that I really wanted to paint, so I took a stab at it. The result is above. I found that I really love using watercolor for underpainting. I am not a watercolor painter, so I just block in the major areas of the painting with watercolor, not worrying about fine details.So far I haven't strayed too far from the "local" colors when painting the underpaintings. If I'm lucky I can keep some of the watercolor uncovered by pastel in the finished product. Even if I do cover it with pastel, just working out the composition with the watercolor makes the painting process a lot easier.
Watercolor Underpainting on Wallis
This is another watercolor painting, this time on Wallis Museum. This surface was a little more resistant to the watercolor but still handled it well.
Pastel and Alcohol Underpainting on Pastelbord
 |
| Pohoiki Bay, near Hilo Hawaii; pastel on Ampersand Pastelbord over pastel/alcohol underpainting |
Watercolor Underpainting on Pastelbord
 |
| watercolor underpainting on Ampersand Pastelbord |
 |
| Finished painting |
Pastel and alcohol underpaintings are great, but I really wanted to try watercolor. I found a photo taken at Monet's Giverney in the Wet Canvas reference image library that I really wanted to paint, so I took a stab at it. The result is above. I found that I really love using watercolor for underpainting. I am not a watercolor painter, so I just block in the major areas of the painting with watercolor, not worrying about fine details.So far I haven't strayed too far from the "local" colors when painting the underpaintings. If I'm lucky I can keep some of the watercolor uncovered by pastel in the finished product. Even if I do cover it with pastel, just working out the composition with the watercolor makes the painting process a lot easier.
Watercolor Underpainting on Wallis
 |
| watercolor underpainting on Wallis Museum sanded paper |
 |
| finished painting |
Watercolor Underpainting on Art Spectrum Supertooth
The watercolor flowed quite nicely on the Supertooth. I was able to control the water plus reflections and the shading on the rocks in the foreground quite nicely.
 |
| watercolor underpainting on Art Spectrum Supertooth |
 |
| finished painting |
Failure
There is nothing like a failed painting to remind me how much I have to learn. For that matter, what I consider my successes would be considered failures by experienced artists. Here are some examples of recent failures:
I did this painting based on a photo of breaking surf in Hawaii. The photo was beautiful, the painting isn't. The first mistake was using the textured side of the paper. The second mistake was working as I was viewing the photo on my tablet. I was unable to see all the nuances of the rocks and did not capture their beauty. The final mistake was when I sprayed on some Spectrafix fixative in hopes of being able to add more pastel. I didn't do a good spray job and some of the pastel ran. Lessons learned. If I were to try this again, I would do it on another surface (or at least on the smooth side of the Canson). I may have to try it again because, take my word for it, the photo is beautiful.
This is another painting based on one of my Hawaii photos. I really love the photo this was based on, but once again I couldn't capture its best qualities in a painting. I wasn't able to capture the light and shadows, as well as the beautiful variations of color and reflections in the water.
I decided to make an attempt to fix it. I removed all of the pastel down to the underpainting and tried again. I went for a looser style, but can't say that it improved matters any. And I wrecked the composition when I made the stream wider.
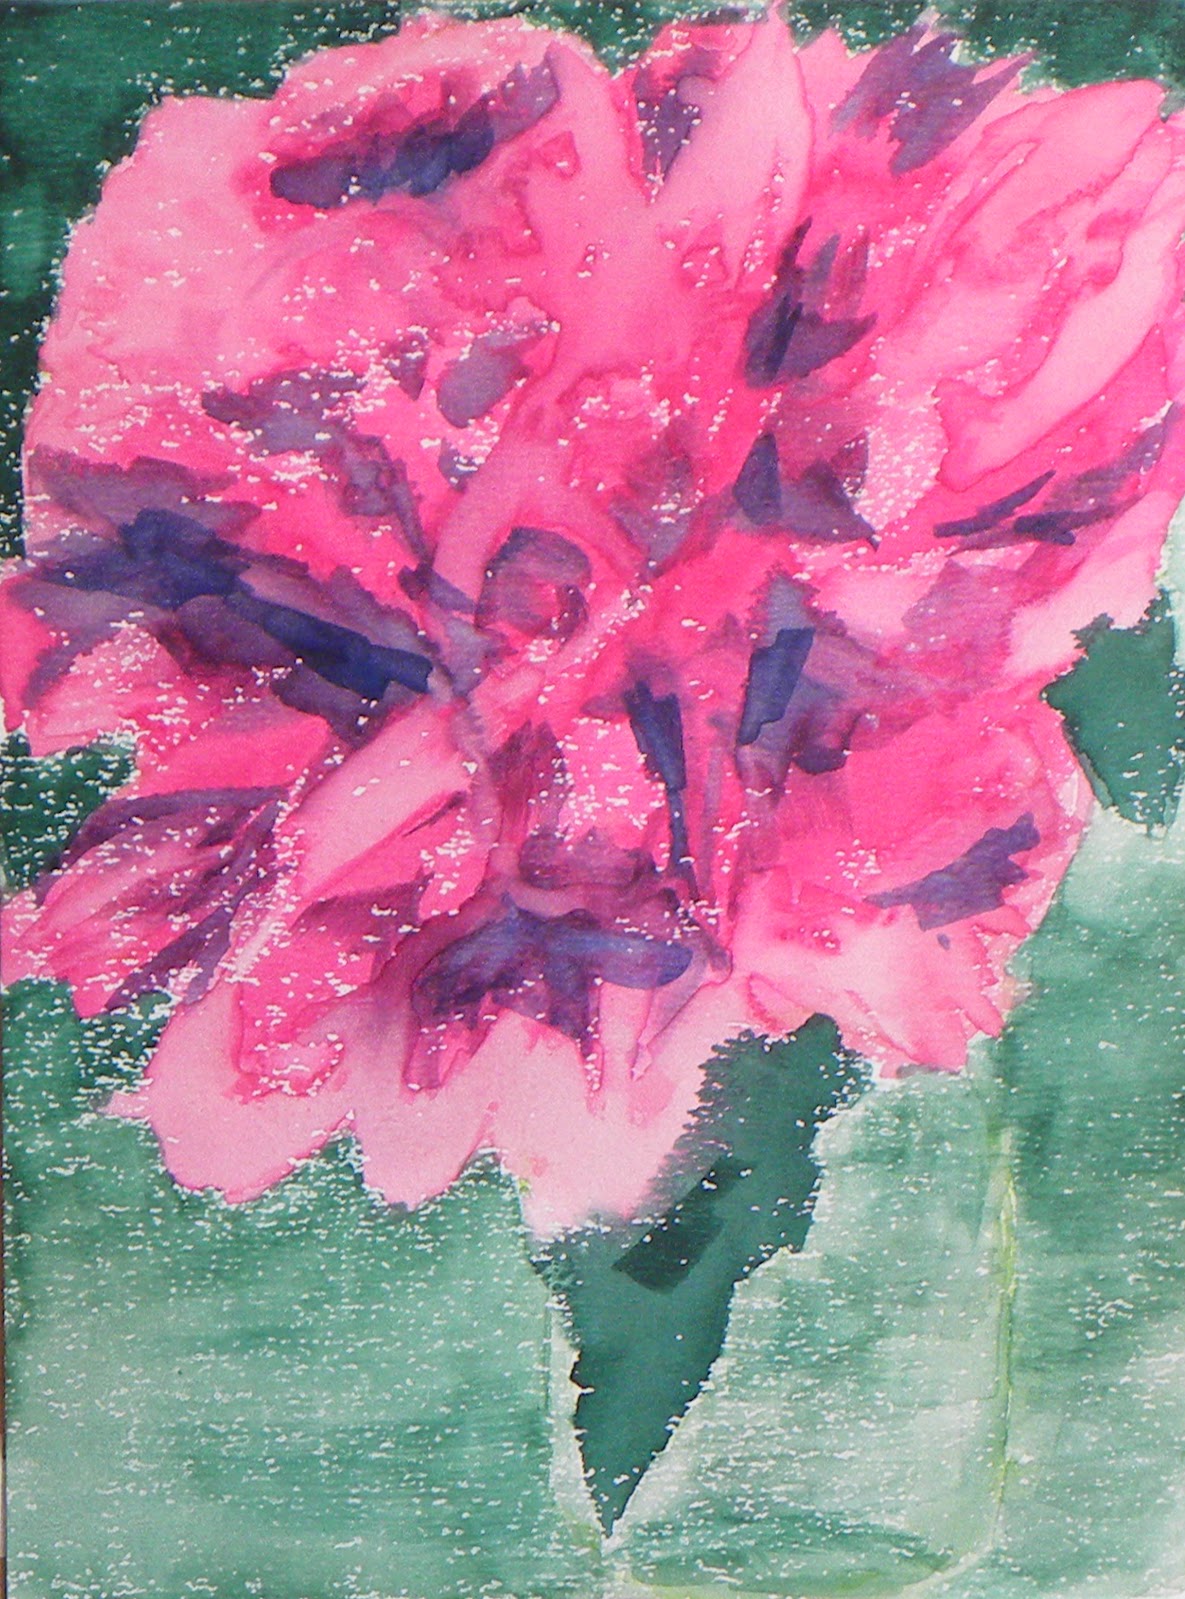
This painting is supposed to be a hibiscus, but it ended up looking like either a frilly flying saucer, or huge orange lips. I was painting this as a gift for my sister-in-law for doing me a favor and ended up with nothing to give her. In retrospect, I think the problem is that the flower appears to be floating in space against the background. I should have realized the composition was a problem when this was in the underpainting stage. Maybe I can salvage this by working on the background, at a minimum add a stem and leaves so the poor blossom isn't suspended in space.
 |
| pastel on Canson Mi Teintes, textured side |
 |
| pastel on Wallis over pastel/alcohol underpainting |
I decided to make an attempt to fix it. I removed all of the pastel down to the underpainting and tried again. I went for a looser style, but can't say that it improved matters any. And I wrecked the composition when I made the stream wider.
 |
| re-work over same underpainting |
 |
| pastel over watercolor underpainting on Wallis sanded paper |
Monday, July 14, 2014
Pastel Paper -- So Many Choices!
The single smartest thing I did since starting to learn about pastels was buying the sample papers and boards from Dakota Pastels. Before buying the sampler I had not tried painting with coated/sanded surfaces. The sampler packs really opened my eyes to what is possible with pastels. I have been working my way through the samples and have found a number of surfaces I really like (and a few that I may never use again). Here is a sampling of the results:
I had already tried the Touch board for the apple still life. The paper is the same surface without the rigid backing of the Mi Teintes Touch board. I really liked this surface. Not my most favorite, but I can imagine using it again.
I loved PastelMat. In fact I loved it so much that I invested in a multi-sheet pad of PastelMat. I'm looking forward to trying some underpainting techniques on it.
Sorry for the bad photo (I took it after it was framed)! Art Spectrum Suede is similar to PastelMat in texture. I had some problems with the lightest areas of the sky -- I had difficulty covering the gray paper with the yellow pastels. I ended up doing a lot of blending with my fingers in the sky (which I rarely do on the textured or sanded surfaces), and that helped to improve the coverage of the pastels.
This was a very quick "sketch" done on yellow La Carte. This is loosely based on a photo I took of palm trees in Hawaii. I just wanted to see how much layering of colors I could do. It responded quite well to multiple layers. One of these days I want to revisit this photo and make an effort to really do it justice. I liked La Carte and ordered a multi-colored pad. The one notable drawback to La Carte is that it does not tolerate water (although I have read that you can do Turpenoid underpaintings on it).
I had read horror stories about pastelists completing a painting on Velour then giving it a good rap or two to shake off loose pastel, only to lose most of the pastel to the dust bin. So I decided to do a colored pencil drawing on it. This was my first attempt with colored pencils and I am pretty happy with the results.
The Richeson surface is coarser and eats up the pastels, but it does a great job of grabbing the pigment. I liked the rigid backing. Not my favorite surface, but I might try it again in the future.
UArt 500 does a great job of grabbing the pastels, and the grit is fine enough to allow more detailed work. This is a surface that I will probably use again in the future.
Sabretooth has a very noticeable texture that I do not like. After I did this painting I found some documentation from St. Armand that says you can sand some or all of the surface to smooth the texture.
I did this painting over a watercolor underpainting. The Wet Canvas Florals and Botanical forum's June "plant parade" challenge was to paint a peony in a loose style to give the impression of the flower (vs. more photo-realistic). If not for the challenge, I probably would have spent some time blending the colors in the peony petals. I may do that yet.
 |
| Canson Mi Teintes Touch paper (black) |
 |
| PastelMat (yellow) |
 |
| Art Spectrum Suede (gray) |
 |
| Sennelier La Carte pastel card |
 |
| colored pencil on Velour |
 |
| Richeson Gator Foam (gray) |
 |
| UArt 500 |
 |
| St. Armand Sabretooth (brown) |
|
| Wallis Museum |
Back from Hawaii, Ready to Paint
So it's the first week in April. I'd just come back from visiting my nephew Bryan in Hawaii. This was my first trip to Hawaii and I had an exceptional time. My smart phone was loaded with lots of photos, some I was hoping to paint. But first I wanted to tackle the apples.
I cracked open my Dakota Pastels sample pack and found a Canson Mi Teintes Touch board in a dark blue color. To my thinking this should be the perfect surface for painting the blue silk background. I had some trepidation because I had done my test apples on the Mi Teintes paper, and the Touch board is a "sanded" surface. But I took the chance and here are the results:
I went for realism with the apples but decided not to replicate the texture of the silk in the reference photo (at http://www.wetcanvas.com/RefLib/showphoto.php?photo=28142&cat=fav). For the apples I blocked in the main colors with NuPastel, then painted over with Blick Artists pastels.
No masterpiece, but for my first effort with the new soft pastels I am pretty pleased with the result.
I cracked open my Dakota Pastels sample pack and found a Canson Mi Teintes Touch board in a dark blue color. To my thinking this should be the perfect surface for painting the blue silk background. I had some trepidation because I had done my test apples on the Mi Teintes paper, and the Touch board is a "sanded" surface. But I took the chance and here are the results:
 |
| pastel on Canson Mi Teintes Touch |
No masterpiece, but for my first effort with the new soft pastels I am pretty pleased with the result.
Sunday, July 13, 2014
Artist's Block, Part 2
I am finding that once you spend your hard-earned money on art supplies, you find yourself not wanting to waste them. Unfortunately that leads to another level of artist's block. A good set of pastels can run into hundreds of dollars. Sanded papers and other textured surfaces can be quite expensive. So you find yourself questioning whether a subject is worth the expense of the supplies used to paint it. This is a dilemma if you really like to paint and you want to get better at it. Getting better requires practice, lots of it.
While searching for information about matting and framing pastel paintings (another expense no one tells you about ahead of time) I chanced upon http://www.wetcanvas.com/. Wet Canvas is a great online resource for artists of all skill levels. I won't endeavor to list everything you can find at Wet Canvas. Suffice it to say I got my answers about how to mat and frame and much more. One of the greatest resources is the Wet Canvas reference image library. Members have uploaded a multitude of reference images that can be used as artistic inspiration without paying licensing fees. I wasted no time downloading a number of photos I wanted to paint.
This is the first one that grabbed my eye:

The unanswered question was: can I paint it? I decided to do a couple of trial runs of one apple on Canson Mi Teintes before committing to a full painting. These two pictures were my first attempts with my new set of Blick pastels. I did two trials: one on the textured side of the paper and one on the smooth side.
My first thoughts were:
While searching for information about matting and framing pastel paintings (another expense no one tells you about ahead of time) I chanced upon http://www.wetcanvas.com/. Wet Canvas is a great online resource for artists of all skill levels. I won't endeavor to list everything you can find at Wet Canvas. Suffice it to say I got my answers about how to mat and frame and much more. One of the greatest resources is the Wet Canvas reference image library. Members have uploaded a multitude of reference images that can be used as artistic inspiration without paying licensing fees. I wasted no time downloading a number of photos I wanted to paint.
This is the first one that grabbed my eye:
The unanswered question was: can I paint it? I decided to do a couple of trial runs of one apple on Canson Mi Teintes before committing to a full painting. These two pictures were my first attempts with my new set of Blick pastels. I did two trials: one on the textured side of the paper and one on the smooth side.
 |
| Blick pastel on textured side of Canson Mi Teintes |
 |
| Blick pastel on smooth side of Canson Mi Teintes |
- I like these pastels!
- I can paint apples!
I was ready to give the full painting a try. But a trip to Hawaii got in my way. I know, what a hardship.
More Supplies
Towards the end of my community ed class in early March it became clear to me that 1) I really enjoyed painting with pastels and 2) I needed to invest in some "soft" pastels. I ended up buying a small set of Sennelier soft pastel half sticks. Sennelier makes very beautiful, rich, soft and smooth pastels (not to be confused with their oil pastels, a completely different beast). I figured the half sticks were the way to go because I could get a feel for them without the additional expense of full sticks.
I also wanted a more complete set of colors, so I also bought a full-stick set of Blick Artists pastels. So-called "soft" pastels actually come in various levels of hardness/softness and generally are classified as hard, medium and soft pastels. The Blick Artists would probably be placed in the medium category. I chose the Blick pastels because 1) they are very reasonably priced compared to other more well known high quality pastels and 2) they were the only ones I could find on the Blick web site that did not have California Prop 65 warnings about potentially harmful, cancer-causing, chemicals. Since I usually use an art barrier cream (Gloves in a Bottle), and I don't eat the pastels, the Prop 65 warning probably shouldn't be that big of a deal. But I figured why not try the Blick pastels and see how they work.
So far I have been very satisfied with the Blick pastels. I have found that some colors (mostly darker) are harder than others, but so far that hasn't been much of a handicap.
Now that I had the pastels I needed to determine what types of pastel support would suit my style (once I figure out what my style is). Through our instructor I found out about the Dakota Pastels web site (http://www.dakotapastels.com/pages/index-sale.aspx). Dakota offers sampler packs of both pastel papers and boards. I put in my orders for both. Now I was ready to go but still didn't know what to paint.
Artist's Block
So now that the class is over what do I do? Starting by gathering the tools of the trade, I bought a small adjustable table for my bedroom "studio" and some pastel paper (Canson Mi Teintes). Now I had something to paint with, but what to paint? I have a number of photos I took of the garden of my old house and thought something in that group of pictures must be pastel-worthy. I settled on a photo of a red maple in bud. It's one of my favorite photos and simple enough that I should be able paint it with my limited skills. I picked out one of the blue-tinted sheets of Mi Teintes and started to paint.
Here's what I learned: I do not like the textured side of Canson Mi Teintes. I had to do a lot of blending with shapers and paper blenders to make the texture less noticeable. Some people might like the texture, but I don't, especially when I am going for a more realistic look.
For my first effort, I am pleased with the result. This painting now hangs in my main-floor powder room.
 |
| NuPastel on Canson Mi Teintes, textured side |
For my first effort, I am pleased with the result. This painting now hangs in my main-floor powder room.
Getting Started
 |
| first drawing using NuPastel |
In a subsequent class we branched out (pun intended) to the following picture:

There were 5 class sessions in total. Following are the remaining paintings I did for the class.


Wednesday, July 9, 2014
Welcome
 |
| Pastel on 9 in. by 12 in. Art Spectrum Supertooth over watercolor underpainting. |
Subscribe to:
Posts (Atom)